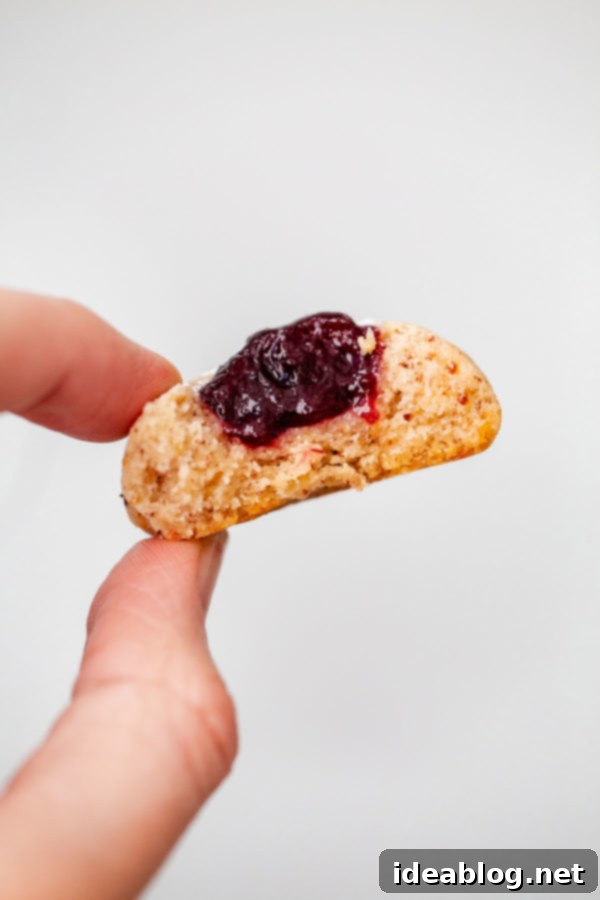
Buttery Hazelnut Thumbprint Cookies with Bright Berry Jam: Your Perfect Easy Holiday Treat
There’s something uniquely comforting about a batch of homemade cookies, especially during the festive season. These buttery hazelnut thumbprint cookies, boasting a rich, nutty flavor and a vibrant, soft berry jam center, are the epitome of simple elegance. Not only are they incredibly easy to make, but their delightful taste and charming appearance make them a fantastic last-minute addition to any holiday table or a welcome treat for an impromptu gathering. Their irresistible combination of tender shortbread-like texture and fruity sweetness is sure to impress everyone.

As the holiday season draws to a close, my kitchen often becomes a haven for sweet creations. While I’m excited to share a plethora of savory recipes with you in the upcoming weeks, for now, my creative energy has been dedicated to crafting delectable desserts. With Christmas just around the corner, simplicity has been my guiding principle. I understand how hectic these final days can become, and the last thing anyone needs is an overly complicated dessert recipe.
That’s precisely why these hazelnut thumbprint cookies with jam are an absolute lifesaver. The dough comes together effortlessly in less than 10 minutes, and here’s the best part: it requires absolutely *zero* chill time! This means you can go from craving to fresh-baked cookies in under an hour, making them ideal for busy schedules or unexpected guests. Their rustic charm and exquisite flavor belie their straightforward preparation, proving that some of the best holiday treats are often the simplest.
A few years ago, I shared a recipe for pistachio thumbprint cookies, which quickly became a favorite. However, I’ve long yearned to introduce another delightful rendition of this classic cookie, exploring new flavor profiles and textures. Hazelnuts, with their distinctively rich and aromatic essence, felt like the perfect choice to elevate this beloved cookie to new heights, offering a warm and inviting twist that’s perfectly suited for the festive season.

How to Master Hazelnut Thumbprint Cookies: An Easy Guide
Thumbprint cookies are a quintessential cookie jar staple, typically characterized by their delightful shortbread-like sugar cookie base and a sweet indentation filled with various delicious toppings. While many recipes incorporate eggs, my version is egg-free, contributing to its signature tender, melt-in-your-mouth texture. Common fillings include fruit jams, flavorful preserves, or decadent chocolate ganache, each adding a unique layer of taste and visual appeal to these charming treats.
What truly sets my favorite thumbprint cookies apart is the strategic combination of both all-purpose flour and a complementary nut flour in the dough. All-purpose flour provides the essential structure and a delicate crumb, while the addition of nut flours introduces an unparalleled richness, depth of flavor, and a more interesting texture that I find utterly captivating. This thoughtful blend creates a cookie that is both sturdy enough to hold its shape and wonderfully delicate on the palate.
For these festive thumbprint cookies, I’ve chosen hazelnut flour to infuse them with a distinctively decadent and sophisticated flavor profile, perfect for holiday indulgence. Hazelnuts contribute a warm, toasty, and slightly sweet note that pairs beautifully with fruit jams. While you absolutely can make homemade hazelnut flour from scratch by finely grinding toasted hazelnuts, for convenience and consistency, I often opt for store-bought hazelnut flour. It saves time and ensures a smooth, uniform dough. Any leftover nut flour can be stored in the freezer, extending its shelf life significantly and keeping it fresh for your next baking adventure.
Although I haven’t specifically partnered with them for this recipe post, I wholeheartedly recommend Bob’s Red Mill for their exceptional hazelnut flour. Its quality is consistently high, delivering fantastic results every time. It’s worth noting that hazelnuts are among the more expensive nuts, making hazelnut flour a premium ingredient. However, its versatility in both sweet and savory applications makes it a worthwhile investment for any enthusiastic baker. The possibilities are truly endless, from enriching pastries to thickening sauces. If, however, purchasing hazelnut flour isn’t feasible or desirable for you, don’t fret! You can effortlessly substitute it 1:1 with almond flour or almond meal in this recipe without compromising the integrity of the cookie. Almond flour will yield a slightly different, yet equally delicious, flavor profile, offering a more delicate nuttiness that is still incredibly complementary to the berry jam filling.
Should you find yourself with extra hazelnut flour after making these delectable thumbprint cookies, consider using it to craft these exquisite espresso hazelnut cookies with dark chocolate drizzle, a perfect treat for coffee lovers. Alternatively, it can be an excellent substitute for almond flour in other recipes, such as these delicate almond crescent cookies or a moist and flavorful blueberry almond cake, adding a unique depth of flavor to each. This adaptability ensures that no precious ingredient goes to waste in your pantry.

Flavor Variations and Filling Suggestions for Your Thumbprint Cookies:
One of the most appealing aspects of thumbprint cookies, in my opinion, is the delightful interplay of contrasting textures. You bite into a wonderfully buttery and slightly sandy (in the most delightful way) cookie base, which then gives way to a softer, luscious filling. Jam thumbprint cookies are my personal favorite, as the fruit’s brightness offers a perfect counterpoint to the rich cookie dough.
To further enhance the naturally sweet and earthy notes of the hazelnut flour, I’ve incorporated fresh orange zest directly into the cookie dough for this recipe. The citrusy aroma and subtle tang of orange zest provide a brilliant complement to the hazelnuts, creating a more complex and aromatic flavor profile. And, of course, these beauties are filled with a generous dollop of vibrant berry jam, adding a burst of fruity sweetness that ties everything together. It’s important to note that some thumbprint cookie recipes instruct you to fill them prior to baking, but for these hazelnut gems, the jam will be added *after* they come out of the oven. This method prevents the jam from scorching, preserves its fresh fruit flavor, and ensures a beautifully glossy and soft center.
When it comes to selecting your jam, a high-quality raspberry or mixed berry preserve would be an excellent choice, as their tartness and sweetness perfectly balance the hazelnut. However, don’t hesitate to reach for whatever you have on hand in your refrigerator! Apricot or strawberry jam would also work beautifully, each offering a slightly different fruity nuance. The key is to choose a jam that you genuinely love, as it plays a starring role in the overall flavor of these cookies.
My best advice for selecting the perfect filling is to opt for a high-quality jam or preserve that boasts a good amount of fruit texture and a strong, authentic fruit flavor, rather than one that is overly sweet. Look for options with a lower sugar content and a higher fruit percentage. The natural acidity of a good fruit jam is crucial here; it helps to cut through and perfectly balance the buttery richness and sweetness of the cookie dough, preventing the cookies from becoming cloyingly sweet. This creates a more harmonious and enjoyable taste experience, leaving you wanting just one more delightful bite.

If you’re still searching for that perfect, effortless cookie recipe to grace your holiday dessert spread, these hazelnut thumbprint cookies are truly an exceptional choice. They embody festive spirit with minimal effort and maximum flavor. Wishing you and your loved ones the happiest of holidays, filled with joy, warmth, and plenty of delicious treats!

Hazelnut Thumbprint Cookies with Jam
Pin
Review
SaveSaved!
Equipment
-
KitchenAid 5 Qt. Artisan Stand Mixer
-
Baking Sheets
-
Parchment Paper
-
Small Cookie Scoop (optional, but recommended for uniformity)
-
Wire Rack
Ingredients
- 1 cup (120 g) unbleached all-purpose flour
- 1 cup (112 g) hazelnut flour or almond flour
- ½ teaspoon kosher salt
- 4 ounces (8 tablespoons; 115g) unsalted butter room temperature
- ¼ cup (50 g) granulated sugar
- zest of 1 medium orange
- 1 teaspoon pure vanilla extract
- powdered sugar for dusting
- ½ cup raspberry jam or preserves or mixed berry or apricot
Instructions
-
Important Note on Measuring Flour: It’s surprisingly easy to over-measure flour when using volume measurements, which can lead to a dry, crumbly, and less desirable cookie dough, especially for delicate thumbprint cookies. For the most accurate and consistent results, I highly recommend using a digital kitchen scale and adhering to the metric measurements provided in this recipe. If a scale isn’t available, please ensure you read my comprehensive guide on how to properly measure flour before you begin to achieve the perfect dough consistency.
-
Begin by preheating your oven to 350°F (180°C) and ensure an oven rack is positioned in the center. Prepare two half sheet pans by lining them with parchment paper – this prevents sticking and makes cleanup a breeze. In a medium-sized bowl, whisk together the all-purpose flour, hazelnut flour (or almond flour), and kosher salt until thoroughly combined. Set this dry mixture aside for later use.
-
In the bowl of a stand mixer, fitted with the paddle attachment, combine the softened unsalted butter, granulated sugar, and fresh orange zest. Beat these ingredients together on medium-high speed for about 3 to 4 minutes, or until the mixture becomes wonderfully light and fluffy. This creaming process incorporates air, contributing to the cookies’ tender texture. Next, add the pure vanilla extract and continue to mix until it is thoroughly incorporated into the butter mixture.
-
Reduce the mixer speed to low. Gradually add the prepared dry flour mixture to the wet ingredients. Mix until the dough just comes together and the dry ingredients are fully incorporated, scraping down the sides of the bowl once or twice as needed. Initially, the dough may appear crumbly, but it will eventually coalesce and become smooth. If, after mixing, the dough remains excessively dry and crumbly, you can add a teaspoon or so of water, one at a time, until it reaches the desired cohesive consistency. Avoid overmixing, as this can develop the gluten and lead to tougher cookies.
-
Using a small cookie scoop or a spoon, portion the dough and roll it into smooth, 1-inch diameter balls. Arrange these cookie dough balls approximately 2 inches apart on the lined sheet pans, allowing for even baking (you should be able to fit roughly 12 cookies per sheet). To create the signature thumbprint, gently indent a hole into the center of each dough ball. You can use the end of a wooden spoon or, traditionally, your thumb, pushing down until you’re just short of reaching the sheet pan. If the edges of the dough crack during this process, simply press them back together to maintain a neat circular shape.
-
Bake the cookies for 16 to 18 minutes. Look for the bottoms of the cookies to be lightly golden, indicating they are perfectly baked. Once out of the oven, allow the cookies to cool on the sheet pans for about 3 minutes; this brief resting period helps them firm up before handling. Then, carefully transfer them to a wire cooling rack to cool completely. For an extra touch of elegance and sweetness, use a fine-meshed sieve to dust the cooled cookies lightly with powdered sugar. Set them aside while you prepare the jam filling.
-
In a small saucepan, gently heat the raspberry jam or preserves over low to medium heat, stirring frequently. Continue to heat until the jam reaches a gentle boil and becomes smooth and slightly thickened. This process helps to soften the jam, making it easier to spoon and giving it a beautiful sheen. Remove the heated jam from the stove. Carefully spoon ½ to 1 teaspoon of the warm jam into the center indentation of each cooled cookie. Allow the jam to cool and set completely; this may take an hour or two at room temperature.
-
Serve your delightful hazelnut thumbprint cookies immediately to enjoy their fresh flavors. For storage, transfer them to an airtight cookie tin, layering them between sheets of parchment or wax paper to prevent sticking. They will keep beautifully at room temperature for up to a week. For longer storage, they can also be frozen in an airtight container for up to 2-3 months.
Tips for Success:
- Hazelnut Flour Substitution: If hazelnut flour is unavailable or if you prefer a milder nutty flavor, feel free to substitute it 1:1 with almond flour or almond meal. Both options create a wonderfully tender and flavorful cookie.
- Dough Consistency: Room temperature butter is key for the perfect dough. If your cookie dough becomes greasy or overly soft during the shaping process, particularly in a warm kitchen, don’t worry! Simply place the shaped dough balls on their sheet pans into the refrigerator for 5 to 10 minutes before baking. This quick chill will help them firm up and maintain their shape in the oven.
- Measuring Flour Accurately: As mentioned in the instructions, using a kitchen scale for flour measurements is highly recommended. If you’re measuring by volume, spoon the flour into the measuring cup and level it off with a straight edge, rather than scooping directly from the bag, which compacts the flour and results in too much.
- Creating the Perfect Indentation: For a neat and deep “thumbprint,” ensure the dough balls are firm. You can use your thumb, but the end of a wooden spoon or even a small round measuring spoon can create a more uniform and perfectly sized well for your jam.
- Jam Temperature: Heating the jam before filling the cookies serves two purposes: it makes the jam smoother and easier to spoon, and it creates a glossy finish. Just be sure not to overheat it to the point of caramelization.
- Cooling Completely: Allow the cookies to cool completely before filling them with jam. Filling warm cookies can cause the jam to spread too much or become absorbed into the cookie, affecting the final texture and appearance.
